

Canvas LMS Integration
Complete guide for integrating Qriib Virtual Classrooms with Canvas LMS via LTI 1.3 — covering Developer Key setup, app installation, and adding live classes to courses.
Canvas LMS Integration
Integrate Qriib Virtual Classrooms seamlessly into your Canvas LMS using the LTI 1.3 Advantage protocol. This integration enables single sign-on (SSO) for instructors and students, automatic roster synchronization (NRPS), and the ability to start and manage live lectures directly inside a Canvas course.
Key Capabilities
| Capability | Description |
|---|---|
| Single Sign-On (SSO) | Instructors and students access the virtual classroom with one click — no separate Qriib account needed |
| Roster Sync (NRPS) | Student and instructor names enrolled in the course are pulled automatically and dynamically |
| Add Classrooms to Course Content | Insert a lecture as an External Tool inside Modules or Assignments |
| Recording Management | Full instructor control over publishing or hiding lecture recordings from students |
Step 1: Get the Integration URLs from the Qriib DevKit Portal
Log in to the Qriib DevKit Portal and copy the following URLs, generated dynamically for your environment:

Step 2: Create a Developer Key in Canvas
- Log in to Canvas with an Admin account.
- Go to Admin and select your root account (e.g. Canvas LMS Dev).
- Click Developer Keys, then click the
+ Developer Keybutton and choose+ LTI Key. - Fill in the configuration form with the following values:
- Method: select Manual Entry.
- Key Name:
Qriib Virtual Classrooms - Owner Email: (your email address)
- Redirect URIs: the Target Link URI (Launch URL) from Step 1
- Title:
Qriib Virtual Classrooms - Target Link URI: the Target Link URI (Launch URL) from Step 1
- OpenID Connect Initiation Url: the OIDC Initiation URL from Step 1
- JWK Method: select Public JWK URL.
- Public JWK URL: the Public Keyset URL (JWKS) from Step 1
- Click Save to store the key.
- In the keys table, toggle the key's State to ON to enable it.
- Copy the Client ID shown in the Details column.
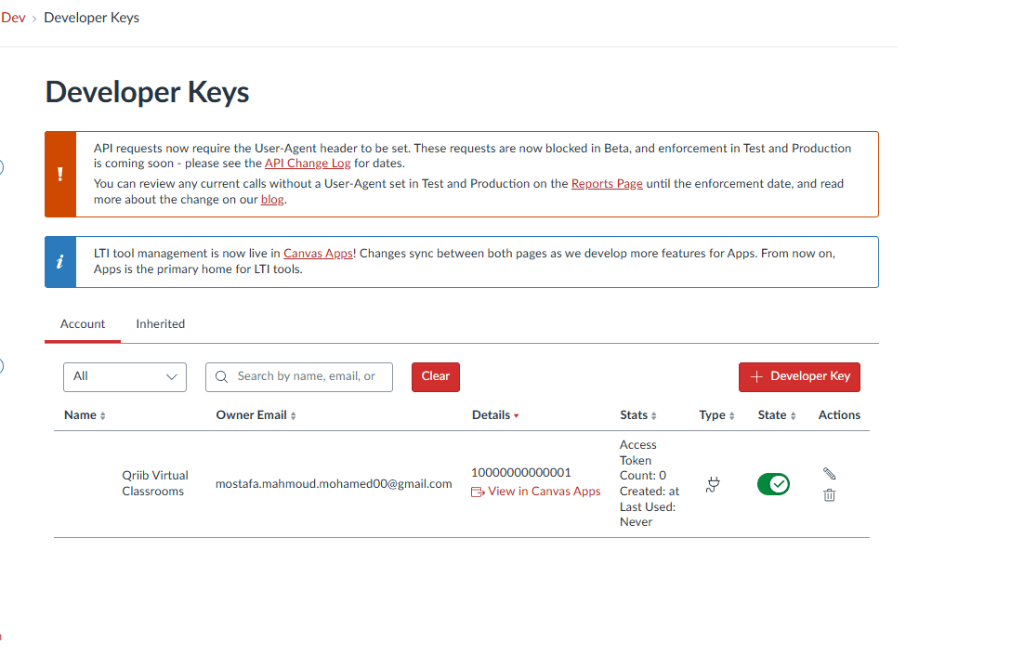
Step 3: Install and Enable the App in Canvas
- Go to the course you want to enable the tool for (e.g. the
mathcourse). - Go to Settings > the Apps tab, then click View App Configurations and
+ App. - Set Configuration Type to By Client ID.
- Enter your Client ID (e.g.
10000000000001), then click Submit and Install. - Unlock the app (one-time step):
- Go to Admin > Apps > the Manage tab.
- Find the app, open its details, and click
Unlock appuntil its status shows App is unlocked (blue lock icon). - Copy the Deployment ID shown there.
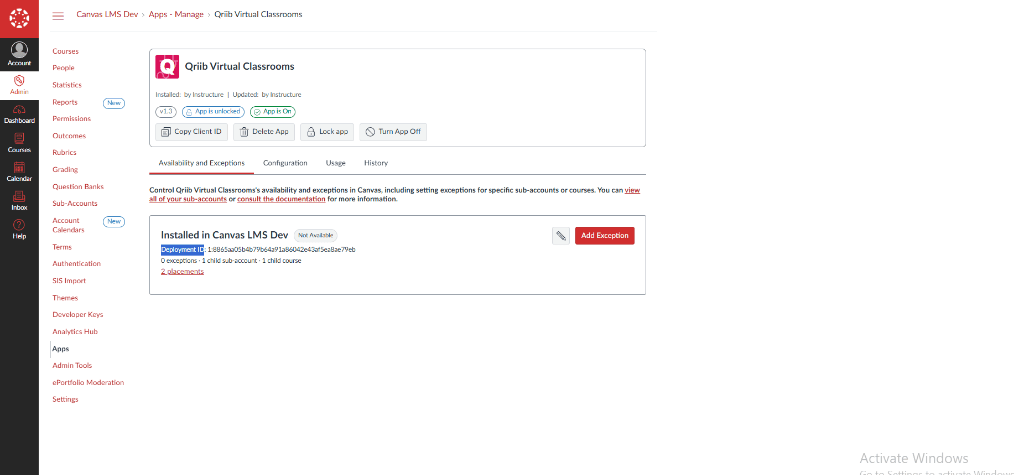
Step 4: Register the Canvas Credentials in the Qriib Portal
Go back to the Qriib DevKit Portal and register the new LMS using the following mapping:
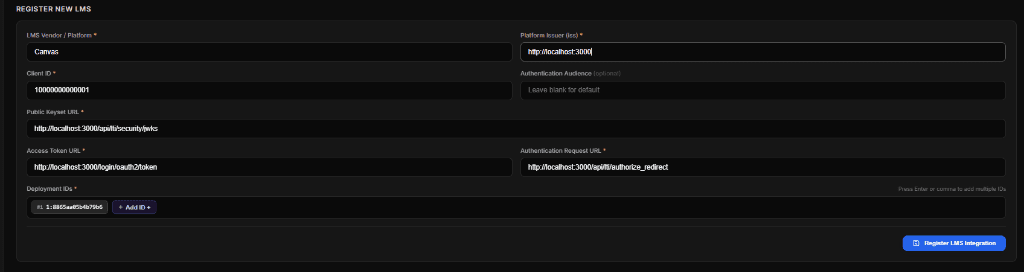
| Qriib Portal Field | Value from Canvas |
|---|---|
| LMS Vendor / Platform | Canvas |
| Platform Issuer (iss) | http://localhost:3000 |
| Client ID | 10000000000001 |
| Public Keyset URL | http://localhost:3000/api/lti/security/jwks |
| Access Token URL | http://localhost:3000/login/oauth2/token |
| Authentication Request URL | http://localhost:3000/api/lti/authorize_redirect |
| Deployment ID | 1:8865aa05b4b79b6a91a86042e43af5ea8ae79eb |
Click Register LMS Integration to complete the setup.
Step 5: Add Virtual Classrooms to a Course (Instructor Workflow)
Instructors can now add a virtual classroom to any course:
- Go to an active course (e.g. the
mathcourse). - Click Modules in the course sidebar.
- Click
+ Moduleto create a new module namedLive Classes.
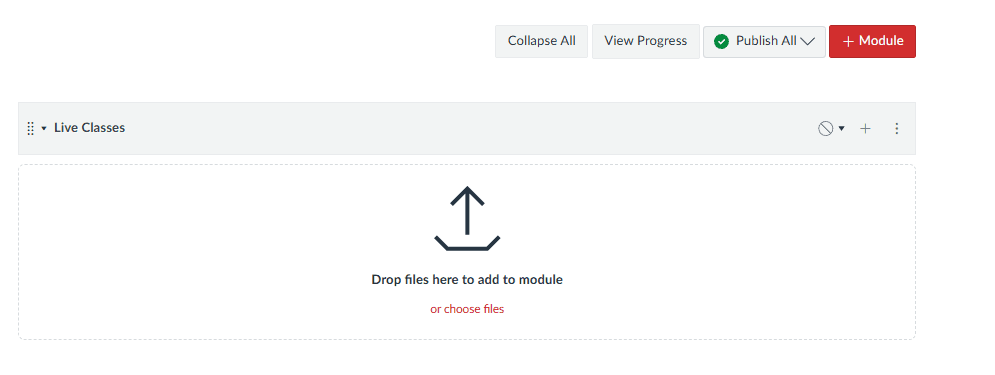
- Click the
+icon next to the module name to add a new item. - In the dropdown list, select External Tool.
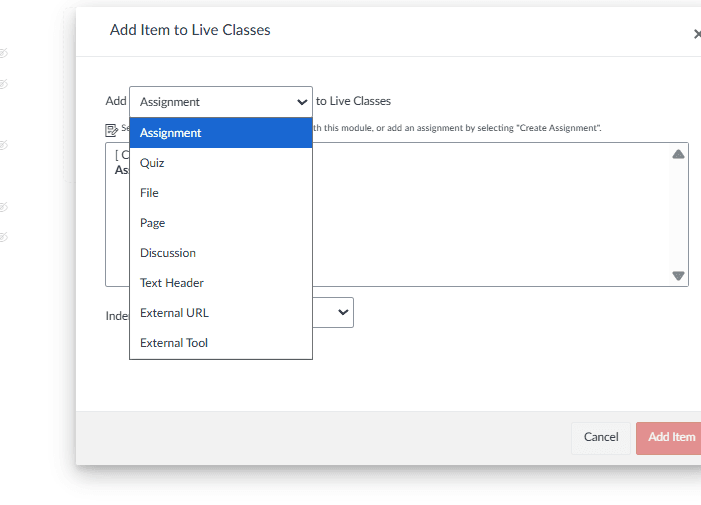
- Select
Qriib Virtual Classroomsfrom the list, then click Add Item. - Clicking the new link opens the virtual classroom workspace, and the lecture can begin.
Moodle LMS Integration
Complete guide for integrating Qriib Virtual Classrooms with Moodle LMS via LTI 1.3 — covering admin setup, instructor workflows, Deep Linking, and developer API reference.
Sakai LMS Integration
Complete guide for integrating Qriib Virtual Classrooms with Sakai LMS via LTI 1.3 / LTI Advantage — covering External Tools registration, AGS/NRPS/Deep Linking setup, security flow, environment configuration, and troubleshooting.