

Moodle LMS Integration
Complete guide for integrating Qriib Virtual Classrooms with Moodle LMS via LTI 1.3 — covering admin setup, instructor workflows, Deep Linking, and developer API reference.
Moodle LMS Integration
Integrate Qriib Virtual Classrooms seamlessly into your Moodle Learning Management System using the LTI 1.3 Advantage protocol. This integration enables automatic student roster synchronization (NRPS), single sign-on (SSO), Deep Linking activity creation, and full lecture lifecycle control — all directly inside Moodle.
Key Capabilities
| Capability | Description |
|---|---|
| SSO via LTI 1.3 | Students and instructors launch Qriib without a separate login |
| NRPS Roster Sync | Course members pulled automatically from Moodle (Enables strict access control) |
| AGS Auto-Grading | Automatically syncs student attendance grades to the Moodle Gradebook when the meeting ends |
| Deep Linking | Instructors embed a Virtual Classroom activity in any Moodle course section |
| Recording Management | Instructors control when recordings are visible to students |
| Session History | Past session logs are accessible inside the workspace |
| Key Rotation | Signing keys can be rotated without re-registering the integration |
Step 1: Obtain Qriib Outbound Credentials
- Log in to your Qriib DevKit Portal.
- Navigate to LMS Integration from the sidebar.
- Locate the Qriib Outbound Credentials section and copy the three URLs dynamically generated for your environment:

Keep this tab open — you will paste these into Moodle in the next step.
Step 2: Configure External Tool in Moodle (Phase 1)
- Log in to Moodle as a Site Administrator.
- Navigate to: Site Administration → Plugins → Manage tools.
- Click Configure a tool manually.
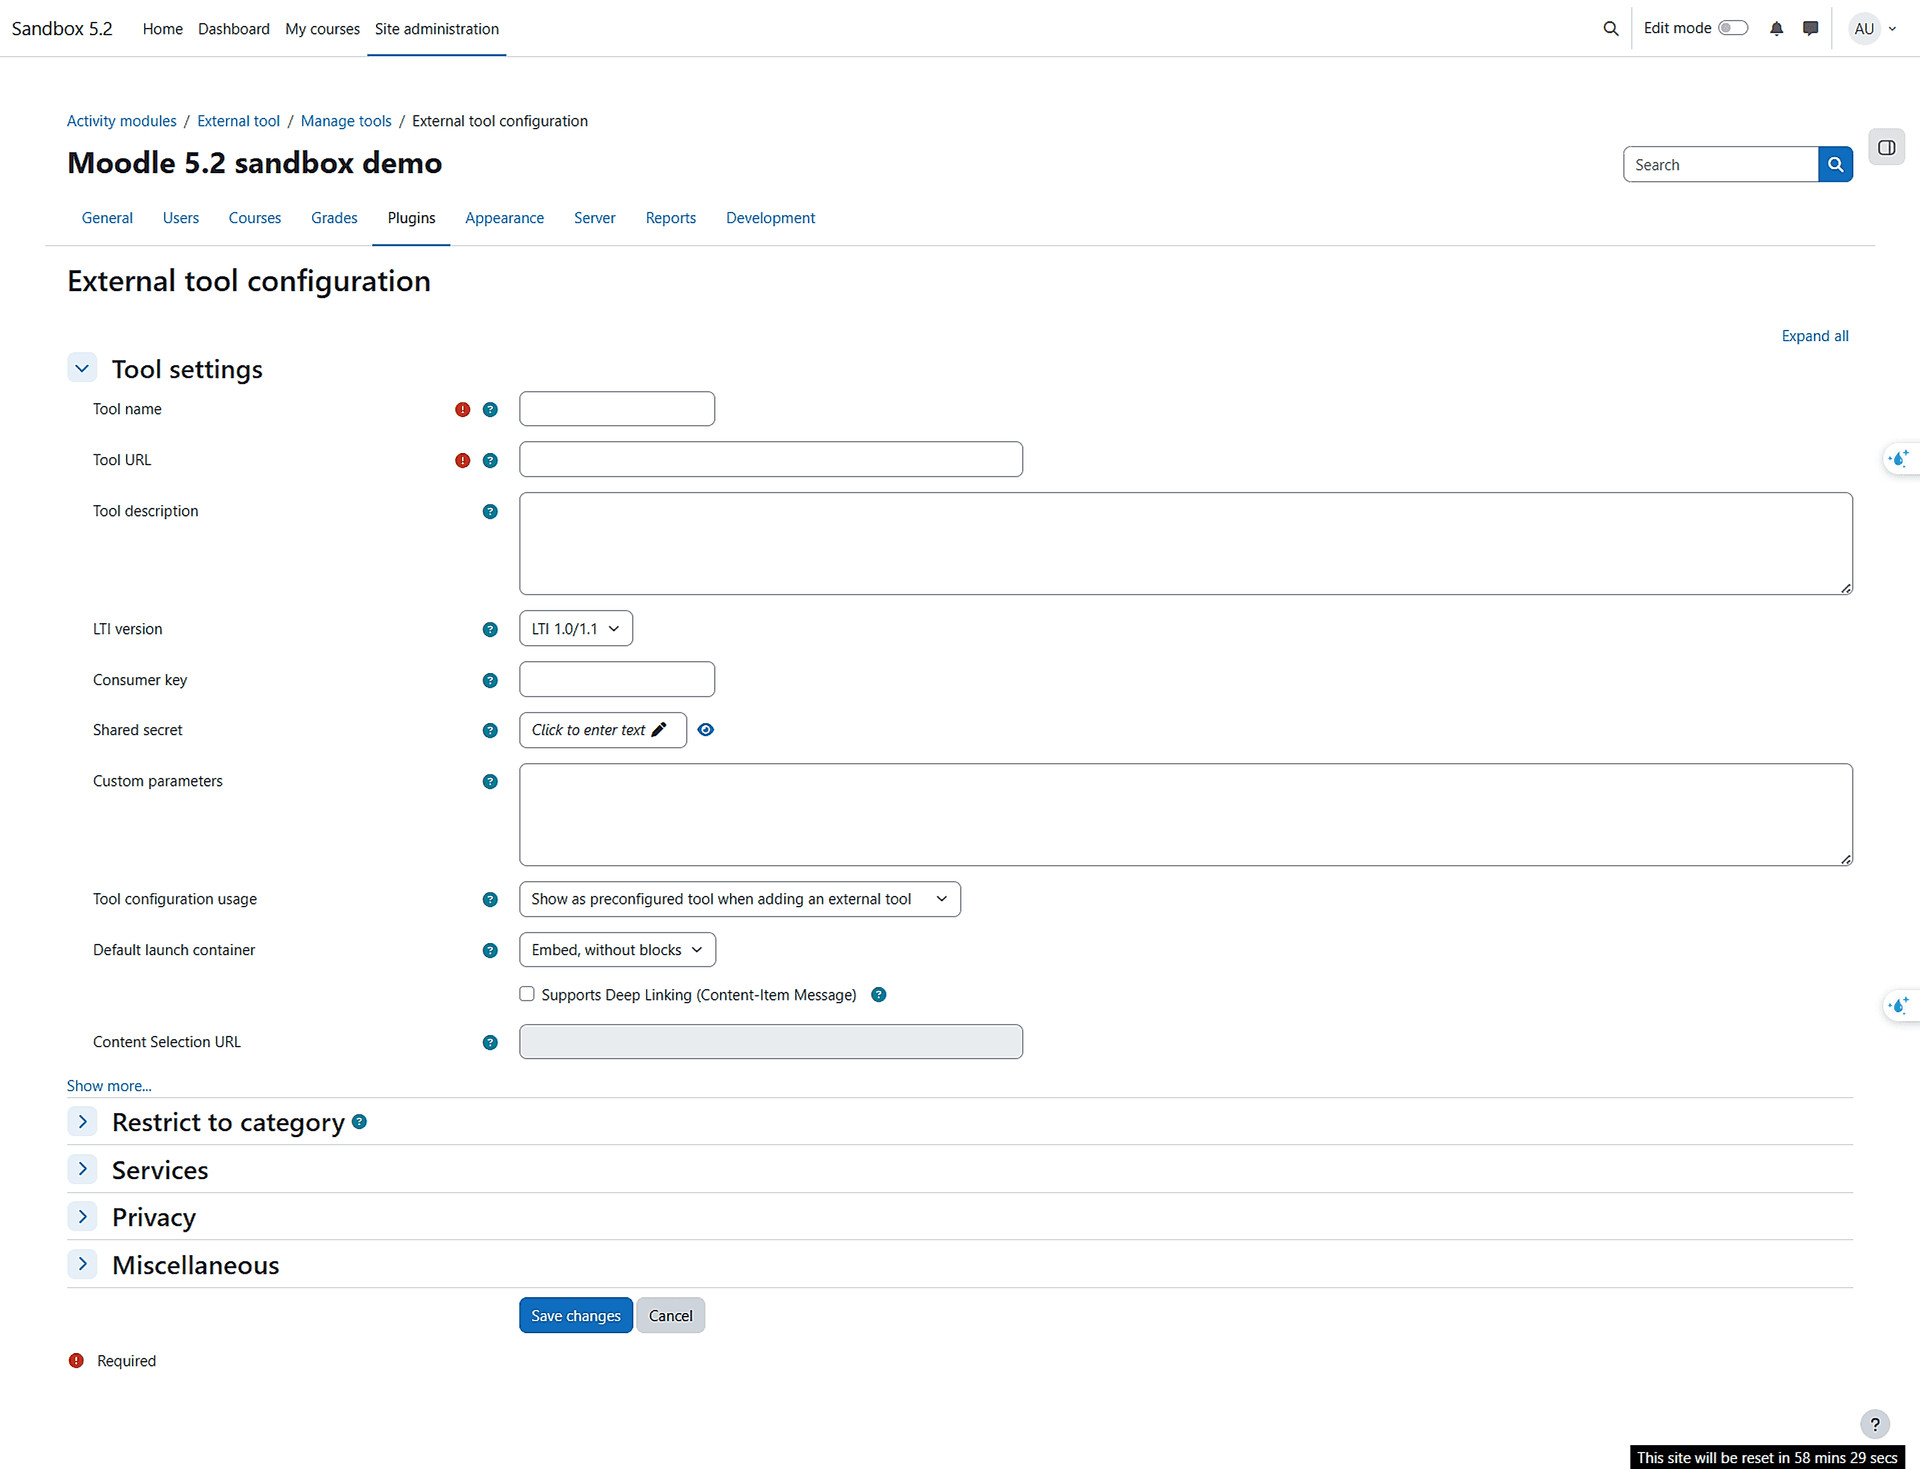
- Fill in the configuration form with the following values:
| Field | Value |
|---|---|
| Tool Name | Qriib Virtual Classrooms |
| Tool URL | https://vcloud-dev.dragonteam.dev/api/v4/lti/launch |
| LTI Version | LTI 1.3 |
| Public Key Type | Keyset URL |
| Public Keyset URL | https://vcloud-dev.dragonteam.dev/api/v4/lti/jwks |
| Initiate Login URL | https://vcloud-dev.dragonteam.dev/api/v4/lti/login |
| Redirection URI(s) | https://vcloud-dev.dragonteam.dev/api/v4/lti/launch |
| Custom Parameters | (Leave blank) |
- Expand Services and Privacy sections and set:
| Setting | Value |
|---|---|
| IMS LTI Names and Role Provisioning (NRPS) | Use this service to retrieve members' information as per privacy settings |
| IMS LTI Assignment and Grade Services (AGS) | Use this service for grade sync and column management |
| Share launcher's name with tool | Always |
| Share launcher's email with tool | Always |
| Accept grades from the tool | Always (or As specified in Tool Configuration) |
- Click Save Changes.
Step 3: Register Moodle Credentials in Qriib (Phase 2)
After saving, Moodle generates platform credentials you must register back into Qriib:
- In Moodle Manage Tools, find your Qriib Virtual Classrooms tool card.
- Click View Tool Details.
- Copy the following parameters:
| Parameter | Description |
|---|---|
Platform ID / Issuer (iss) | Your Moodle instance base URL |
| Client ID | Unique identifier Moodle assigned to this tool |
| Deployment ID | Identifies the specific deployment context |
| Public Keyset URL | Moodle's JWKS endpoint for signature verification |
| Access Token URL | Moodle's OAuth 2.0 token endpoint |
| Authentication Request URL | Moodle's OIDC authorization endpoint |
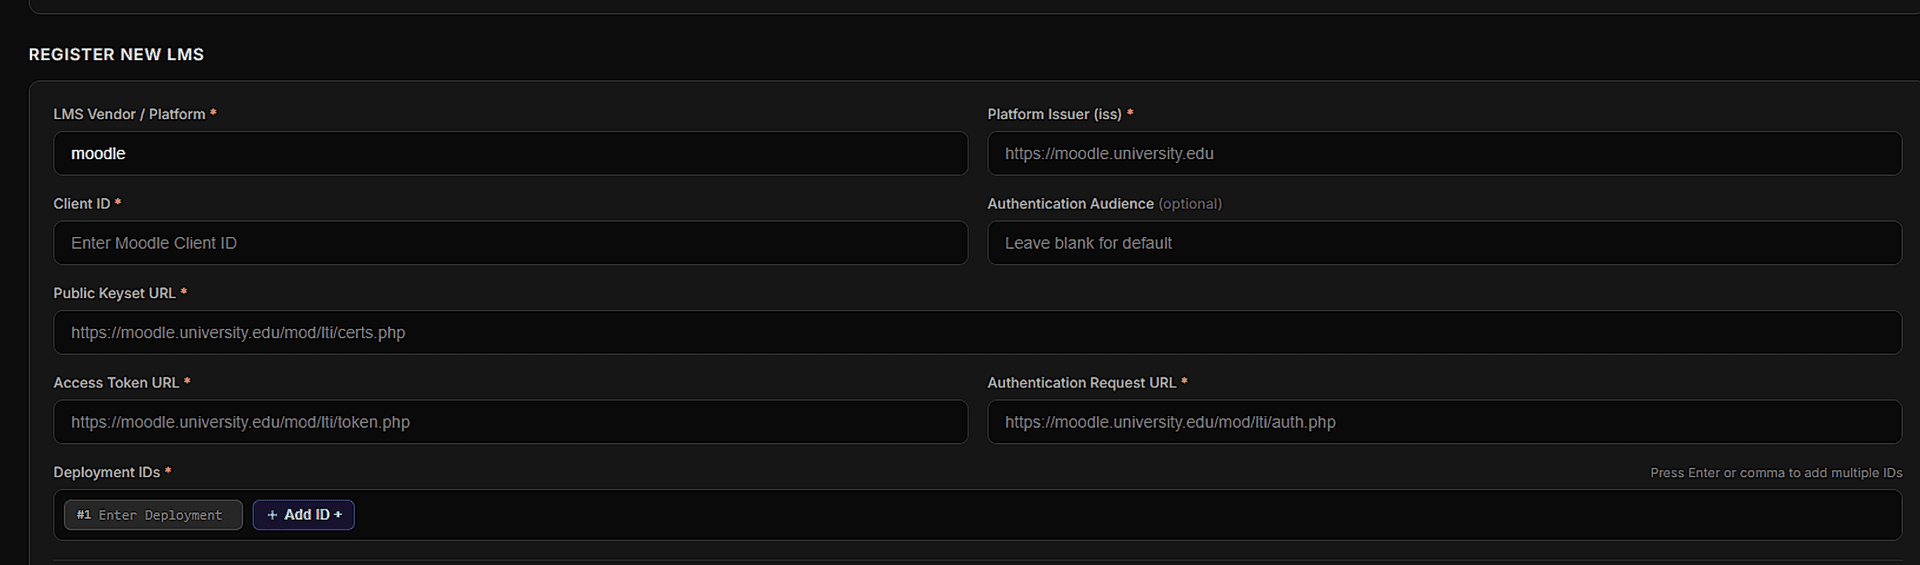
- Return to Qriib DevKit Portal → LMS Integration.
- Paste the values into the LMS Inbound Configuration form.
- Click Register LMS Integration.
Step 4: Add Virtual Classrooms to Courses (Instructor Workflow)
Instructors add Virtual Classrooms directly inside their respective Moodle courses (not in Site Administration):
- Go to My courses from the Moodle navigation bar and open your course (e.g., CS501 Computer Science).
- Toggle Edit mode ON in the top-right corner of the course page.
- Click Create course (or select an existing course).
- Click Participants in the course menu and click Enrol users.
- Select users, set Assign role to Teacher (or Student), and click Enrol users.
- Click More in the course top navigation bar.
- Select LTI External Tools.
- Find Qriib Virtual Classrooms and toggle Show in activity chooser to ON (active).
- Return to your course section, click + Add an activity or resource, and select Qriib Virtual Classrooms.
- Provide an Activity Name (e.g., CS501 Live Lecture).
- Expand the Privacy section and ensure Accept grades from the tool is checked.
- Expand the Grade section and set Type to
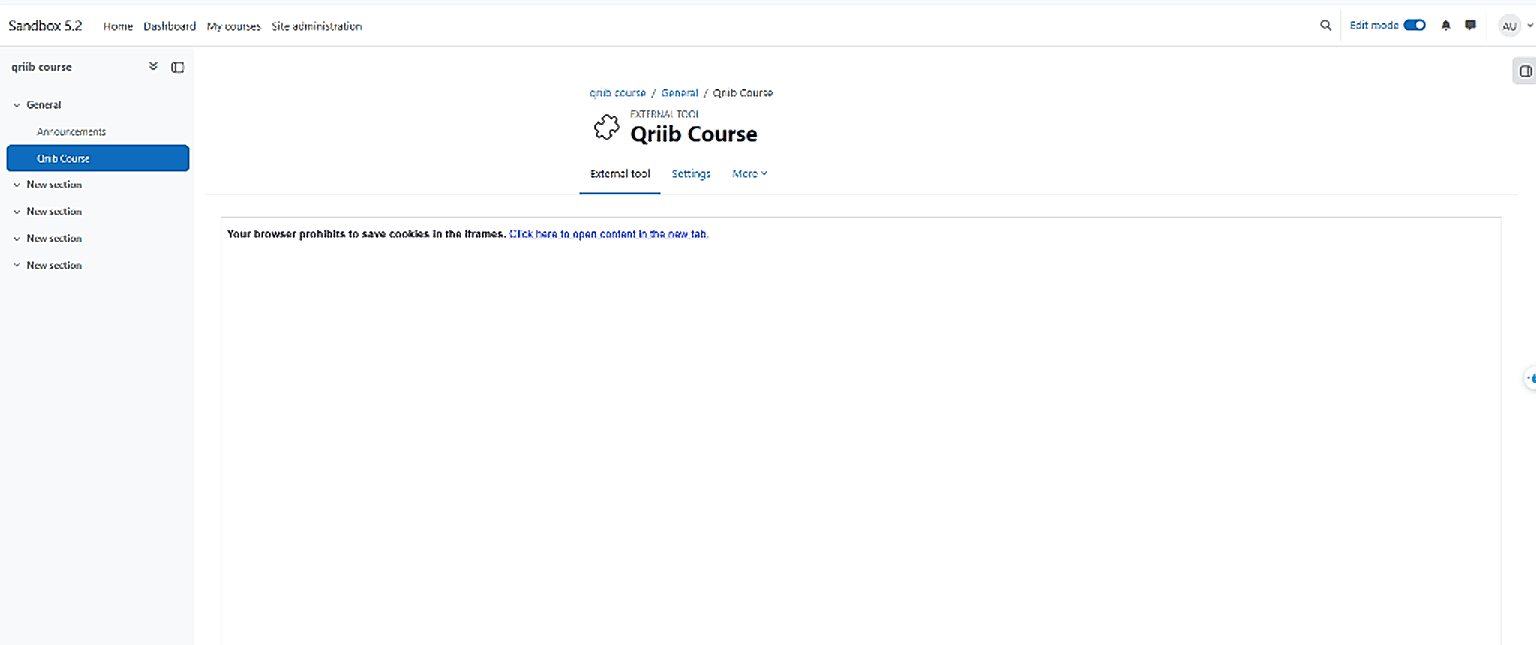
Pointand Maximum Grade to your desired value (e.g.,100). - Click Save and return to course. When students or instructors click the link, a Deep Linking confirmation page is shown inside Moodle, then the Virtual Classroom workspace launches:
Workspace Roles & Capabilities
The workspace renders differently based on the user's LTI role:
Instructor View
When launched by an Admin or Instructor (Teacher), the workspace allows them to create and start a meeting immediately via the Create Quick Meeting button:

| Capability | Description |
|---|---|
| ✅ Create Meeting | Start a new virtual classroom session immediately |
| ✅ Join Meeting | Enter the active session |
| ✅ End Meeting | Terminate the session for all participants and sync attendance grades (AGS) |
| ✅ View Session History | Past session logs are accessible inside the workspace |
| ✅ Manage Recordings | Instructors control when recordings are visible to students |
| ✅ View Course Roster | Course members pulled automatically from Moodle |
Learner (Student) View
| Capability | Description |
|---|---|
| ✅ Join Active Meeting | Enters the live session when one is active |
| ✅ View Published Recordings | Lecture recordings published by your instructor |
| ❌ Create / End Meeting | Not allowed |
| ❌ Manage Recordings | Not allowed |